12 Easy Steps to Check Your Facebook Privacy Settings
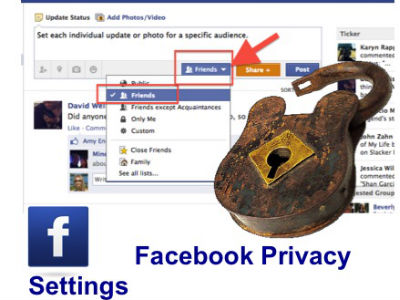
Are you certain your privacy settings are doing what you think they should be doing for you? Have you checked all your Facebook privacy settings lately?
Many Facebook users are unaware that what they are reading, watching or listening to may be posting to Facebook for others to see. In other words, they probably haven’t taken the time to check their Facebook Privacy Settings. Some users are unknowingly being “Checked into Places” which tells friends where they are, whether they want to share this information or not. According to an article in the June 2012 issue of Consumer Reports, “Almost 13 million Facebook users have never set privacy controls.”

This friend was unaware he’d been “Checked in” with Facebook Places
I don’t mean to be a nosy person, however, I often learn what my friends are up to by reading posts in my Facebook news feed. This morning, I noticed a post about where a friend had been last night. When I asked him if he had fun at Hemmingways with Alex and Alexis, he wanted to know how I knew where he was and who he was with. He hadn’t told me about his plans and he did not know his whereabouts had posted to the news feed. Fortunately, Facebook users can customize privacy settings to prevent friends from “checking them in” with Facebook Places.

My friend did not know this posted to the news feed
Along the same lines, I asked a friend, if she knew that videos she was watching were posting to the feed. She was unaware of the automatic posts on her friends’ walls and tickers after she watched a video with Socialcam. She immediately deactivated Socialcam and was relieved that the auto post was about Funny Video Accidents and not something embarrassing.
Even if you’ve carefully checked your settings before, it’s a good idea to review them periodically. I just checked mine (via a previous article, How to Verify and Edit Facebook Privacy Settings) and found apps I didn’t recognize that were using my personal information. I had unknowingly given these apps permission to make posts on my behalf. I also found privacy options that were either new or that I missed the last time I checked my settings.
Avoid mishaps by clicking on blue hyperlinks to verify or change your settings directly in your Facebook profile.
If you’re not signed in, you will be prompted to sign into your Facebook account to use the hyperlinks. Personal settings will open up in another window so you can easily toggle back and forth to directions. To avoid confusion, I recommend closing the settings windows after completion of each step.
If you have not upgraded to Timeline, CLICK HERE to check your Facebook settings via the October 2011 post. There have been changes to Facebook so some options referred to in that article no longer exist.
How to Set your Timeline Facebook Privacy Settings
1. Enable Secure Browsing
To protect your Facebook account from hackers, enable HTTPS for secure browsing. (Step 1) CLICK HERE to get to the Security tab in your Account settings. Click the Edit button to enable secure browsing if it is not already set that way.

Notice the “s” after Http. Enable Secure Browsing
2. Keep Some Contact Info Private
Click on the About section of your Timeline profile and use drop down menus and Edit to customize your preferences or (Step 2) CLICK HERE to take you there directly.

Click on “About” on Your Personal Timeline Page
I prefer to keep contact information private so I only include what I am comfortable having most people know. It’s okay to leave sections blank and to designate required information as “Only Me.” See circled areas below that highlight areas you can edit your personal information.

Customize Personal Information to Meet your Needs
3. Organize your Friends into Lists
On Timeline, you will get a list of photos of your friends. Place your mouse over each name to get a drop-down menu with options. See example below for my friend, Beverly Macy, Author, UCLA Instructor and Social Media Marketing Expert.

Hover lightly over each contact name for a drop down menu
(Step 3) CLICK HERE to assign a privacy setting to each person and to organize your contacts into lists. (If you have a lot of friends, this will take time, so you can come back to this step another time after you test it out on a friend or two.)
- Place your cursor lightly on a name and a pop up will appear that will let you know the designation of that person.
- Place your cursor on the lower right where it says the type of friend, and another menu will pop up which will enable you to categorize your friends into lists.
- Check or un-check “Show in News Feed” to mark whose information you wish to see in your feed.
- The settings tab (Below “show in news feed”) will allow you to select the type of information you wish to see from each person.
![]() Close Friends: You can add your best friends to this list to be notified each time they post. You can turn these extra notifications off.
Close Friends: You can add your best friends to this list to be notified each time they post. You can turn these extra notifications off.
![]() Acquaintances: Acquaintances will rarely show up in your News Feed. You can exclude acquaintances from select posts by choosing Friends except Acquaintances in the audience selector.
Acquaintances: Acquaintances will rarely show up in your News Feed. You can exclude acquaintances from select posts by choosing Friends except Acquaintances in the audience selector.
![]() Restricted: For people you’ve added as a friend but don’t want to share all your content with, like your boss. Friends on your Restricted list, will only be able to see your Public Content or posts that you tag them in.
Restricted: For people you’ve added as a friend but don’t want to share all your content with, like your boss. Friends on your Restricted list, will only be able to see your Public Content or posts that you tag them in.
- Your friends won’t get notified when you add them to these lists
- You can add each friend to more than one group
- Each List can have a specific privacy policy applied to it
4. Control How You Connect with People You Know
(Step 4) GO HERE to Main Privacy Settings and begin by selecting the default setting for your posts (setting your posts will automatically default to unless you manually change it) by putting your cursor in the appropriate circle. Individual posts can be changed as needed.

Set your Default Privacy. It can be changed manually on individual posts
Next, (Step 5) CLICK HERE to go to the How You Connect area (Just below Default Privacy) and click on Edit Settings.

Click on “Edit Settings” to get a drop-down menu.
Use drop-down menus to customize your preferences for being found on Facebook, for receiving friend requests and to choose who you want to allow to contact you via Facebook.

Use Drop-Down Menus to set your Preferences
6. Control What Happens When Friends Tag Your Photos or Your Content.
Tag Suggestions save time and simplify photo tagging. If a friend uploads a photo that looks like you, Facebook will suggest adding a tag of you. Friends can ignore or take suggestions but nothing gets tagged automatically.
You cannot prevent friends from tagging you but you can receive notification each time you are tagged. You can easily untag a photo or post if you choose to.
(Step 6) GO HERE to Main Privacy Settings and Edit Settings under Timeline and Tagging. Descriptions follow screen shots.

Click on “Edit Settings” to get a drop-down menu
Use drop-down menus to customize your preferences.

Use Drop-Down Menus to Customize your Preferences and to Enable or Disable Options
When you approve a tag, the person who tagged you and that person’s friends can all see the post. Of course, you and your friends will also see the post.
To prevent others from “Checking you into Places,” make sure your settings allow you to pre-approve posts you are tagged in before they post to your Facebook page by enabling Timeline Review or turning the setting to “On.”

Enable Timeline Review – turn setting to “on”
7. Control what gets shared with Apps, Games and Websites
THIS IS WHERE PRIVACY IS OFTEN COMPROMISED SO PAY CLOSE ATTENTION TO THIS SECTION.
(Step 7) GO HERE to Main Privacy Settings and Edit Settings under Ads Apps and Websites and click on Edit Settings.

Edit Settings for Ads, Apps and Website Settings

Edit settings to control what’s shared with apps, games, and websites by you and others you share with
Notice, I have 9 active apps now. I instantly removed a couple I didn’t recognize.

Review and adjust settings of all items in list by opening each “Edit” Setting
Be aware of what personal information is being accessed by each app. since this information is easily available under each app. At this step, I changed the settings of a few apps that had more access to my personal information than I wanted them to have.
8. Manage How People Use Your Information in their Apps
(Step 8) First, CLICK HERE to go to Main Privacy Settings and Edit Settings under Ads Apps and Websites and click on Edit Settings.
- Edit Settings for Ads, Apps and Website Settings
Second, move your curser down to How people bring your info to apps they use and click on Edit Settings.

Customize what Personal Information you are Willing to Share with Apps
The drop-down “Edit Settings” menu gives you the option to check or un-check the type of information you are willing to share. You can turn off all platform apps but this will prevent you from using the apps yourself.

Check Boxes of Information You Want to Share. Un-check Boxes of Private Information!
After you save your settings, simply move your curser down to the instant personalization setting and edit those settings or get there from scratch by proceeding to step 9.
9. Instant Personalization
Facebook has partnered with a few websites to provide personalized experiences for its users. These partners access public information (like name and profile picture) and other information that’s been made public.
When you first arrive at the sites below, you’ll see a notification message and an option to turn off the personalized experience:
Bing – Social Search, Pandora – Personalized Music, TripAdvisor – Social Travel, Yelp – Friends’ Local Reviews, Rotten Tomatoes – Friends’ Movie Reviews, Clicker – Personalized TV Recommendations, Scribd – SocialReading, Docs – Document Collaboration
(Step 9) CLICK HERE to go to Main Privacy Settings and Edit Settings under Ads Apps and Websites and click on Edit Settings.
- Edit Settings for Ads, Apps and Website Settings
Second, turn off instant personalization on all partner sites by editing settings and then unchecking the box in the pop up menu. (You may need to close a video screen to get to the box)

Enable this setting for a personalized experience on Facebook’s partner sites

Instant personalization has been disabled above. Check box to enable it
After you complete this step, you can click on the “Back to apps” button and then simply curser down to the next setting of Enabling or Disabling public search or you can start from scratch in Step 10.
10. How to Remove Yourself from Searches by Google and other Search Engines
I like being able to find people through Google searches and don’t mind if the information I designate as Public is accessible.
If you don’t want to be found by search engines, you can (Step 10) CLICK HEREto go to Main Privacy Settings and Edit Settings under Ads Apps and Websites and click on Edit Settings.
- Edit Settings for Ads, Apps and Website Settings
Second, move your curser down to “Public Search” to disable the Public Facebook search feature.

Enable or Disable Public Search
After selecting Enable or Disable public search, you can use the “return to apps” button at the top of the screen and then the box to return to privacy settings to get to this next setting of limiting who can see past posts.
11. Limit Who can See Past Posts
Follow directions carefully as this cannot be undone once completed and it will change your Timeline. (I did not utilize this feature as I had no posts I was concerned about.) (Step 11) CLICK HERE to Manage Past Post Visibility in the Limit the Audience for Past Posts area of the Privacy Settings.

Limit Audience from Past Posts
12. Manage People and Apps you want to Block
This is straightforward so simply go through each option and set your preferences once you get to the drop-down menu.
(Step 12) CLICK HERE to get to Manage Blocking in the Blocked People and Apps section of the Privacy Settings.

Manage Past Post Visibility

Go through each section to select the options that meet your needs
Facebook’s inline audience selector gives you the ability to manage privacy right where you post, each time you post!

You can choose your audience before or after you make a post
You’ll see the inline audience selector wherever you share content, whether it’s a status update, a photograph, an album or information on your Timeline.
The audience selector remembers the audience you shared with the last time you posted something and uses the same audience when you share again unless you change it. For example, if you choose Public for a post, your next post will also be Public unless you change this audience when you post. (Be careful with this feature. I can easily see myself making a single post public and then forgetting that my future posts will be designated as public too.)
If you want to change who you’re sharing with, open the dropdown menu and choose a different audience, even after you posted something. Remember: anyone you tag in a post, along with their friends, may see the post.
If you got through this entire article, congratulations! The reality is that you can maintain a decent amount of privacy if you take the time to understand privacy settings and to personalize them to meet your own needs. That said, it’s always wise to think twice or even three times before posting on Facebook. It’s true that many settings can be changed. But once a post has been viewed or shared, it’s out there and you never know if it will came back to bite you in the future!


This is a great article on how to be more secure on Facebook. Another growing problem is the security of kids on FB…in relation to online predators. There’s a great new app out there that allows parents to better protect their kids on Facebook. The app is called RedFlag and it’s gaining in popularity. It might make for a great follow-up article.
You are right, Kristy. The security of kids on Facebook is a huge issue. Great to hear about products such as RedFlag that can watch over them. I looked at the website – http://www.redflag.com/ – it looks like a fabulous tool for parents. I hope to hear from parents that are using it successfully so I can share that information in a future blog post.
Such GREAT information!!! I have SO much to learn … especially since I thought I’ve been on “PRIVATE” and now realize that I haven’t set all the privacy steps! I LOVE the step-by-step process and the “CLICK HERE” buttons. SO SO SO SO helpful! Thanks!!!
Glad to be of service! Thanks for the feedback. 🙂 Hayley
Hayley, what an incredible article! The depth of your articles, your graphics, and information can help us prevent intrusion into our busy lives.
Keep up the good work! I am very proud of all of your endeavors.
Mamacita Kaplan
Thanks again for another informative article. While Facebook is the best social networking tool ever, it leaves you completely exposed and with no privacy if you don’t follow these useful steps to protect yourself. I am definitely going to follow these instructions to check on my settings now.
Well done Hayley!
Well done, great information – all the more reason for me to stay off Facebook!
Thanks for a great tutorial, Hayley! I better make some of these changes or it could get embarrassing!
Well done!
Super detailed!
Thank you for being so investigative, you make our lifes a bit more secure each Blog at a time!
Great article, filled with information on keeping us safe along with maintaining a level of privacy. After seeing a photo of myself in a group, that I had no idea was on another friends site, I can have more control over what is posted without my permission.
Looks like I’m going to have a little project on my hands…it’s a full-time job keeping discreet. Thanks for showing us how.
Very helpful and informative. It’s hard to keep up with Facebook as they are constantly updating and changing their settings. I found this article especially useful in helping to regulate something like ‘Places’ which allows people to check you in at various locations automatically or with approval.
Thanks for letting me know, Brent. The settings for “Places” are a good example of a change. Before timeline, you could simply check a box to prevent others from checking you in. Now the change is more generic and it stops others from posting to your Facebook without your permission.